
Key Takeaways
|
Calibrating Projectors for Sports, Movies & Gaming: Mode-by-Mode Guide
A projector can look breathtaking one moment and completely underwhelming the next. The difference is rarely the hardware. It is almost always the settings.
Sports demand brightness and motion clarity. Movies depend on accurate color reproduction and deep contrast. Gaming prioritizes low input lag and fast refresh response. When one preset tries to handle all three, something suffers. Blacks turn gray, motion becomes blurry, or controls feel delayed.
This guide breaks down calibration mode by mode, focusing on practical adjustments that match real viewing scenarios.
Understanding Projector Picture Modes Before Calibration
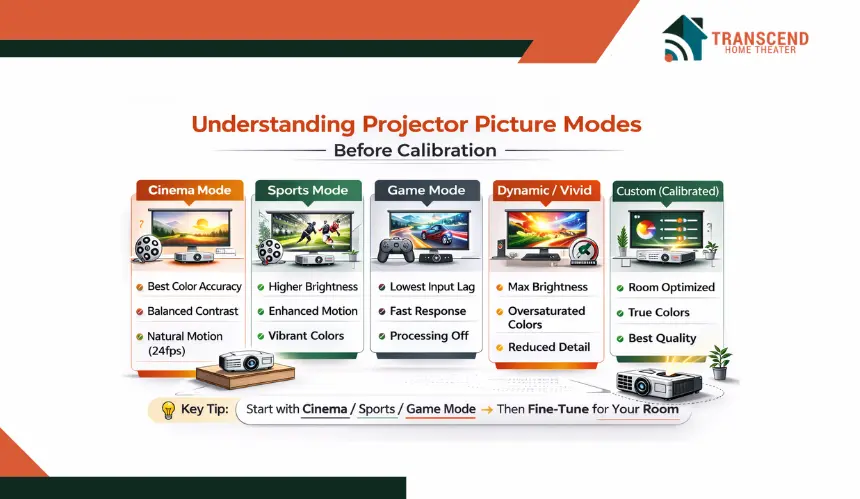
Before changing sliders and advanced controls, it helps to understand what projector picture modes actually do. Most modern projectors come with presets such as Cinema, Sports, Game, Dynamic, or Vivid. These are not random labels. Each preset adjusts brightness output, color temperature, gamma curve, motion processing, and internal image processing algorithms.
However, factory presets are designed for broad environments, not your specific room, screen, or viewing preference. That is why understanding their purpose is the first step toward accurate calibration.
What Is The Difference Between Cinema Mode, Sports Mode, And Game Mode
Each mode prioritizes a different performance goal.
Cinema Mode focuses on color accuracy and balanced contrast. It usually targets the Rec.709 color space and a D65 white point. Gamma is typically set between 2.2 and 2.4 to preserve shadow detail. Motion smoothing is often reduced to maintain natural 24fps playback.
Sports Mode increases brightness and enhances motion clarity. Frame interpolation or motion enhancement features may be enabled to reduce blur during fast camera pans. Color temperature can shift slightly cooler to make the image appear more vibrant under ambient light.
Game Mode reduces input latency by disabling unnecessary image processing. Features such as noise reduction, dynamic contrast adjustments, and motion interpolation are often minimized. This shortens the signal processing pipeline and improves controller responsiveness.
Understanding these differences prevents users from trying to force one preset to handle every type of content.
Why Dynamic Or Vivid Mode Often Looks Artificial
Dynamic or Vivid mode is designed to stand out in brightly lit retail environments. It typically pushes maximum lamp brightness, boosts contrast aggressively, and oversaturates colors. Skin tones can look unnatural, and black levels often appear washed out.
While it may initially look impressive, this mode frequently sacrifices color accuracy and shadow detail. Over time, eye fatigue increases because whites are overly intense and highlight easily. For home use, it is usually better to start with Cinema, Sports, or Game mode and fine-tune from there.
Establishing A Proper Baseline Setup Before Calibrating Any Viewing Mode
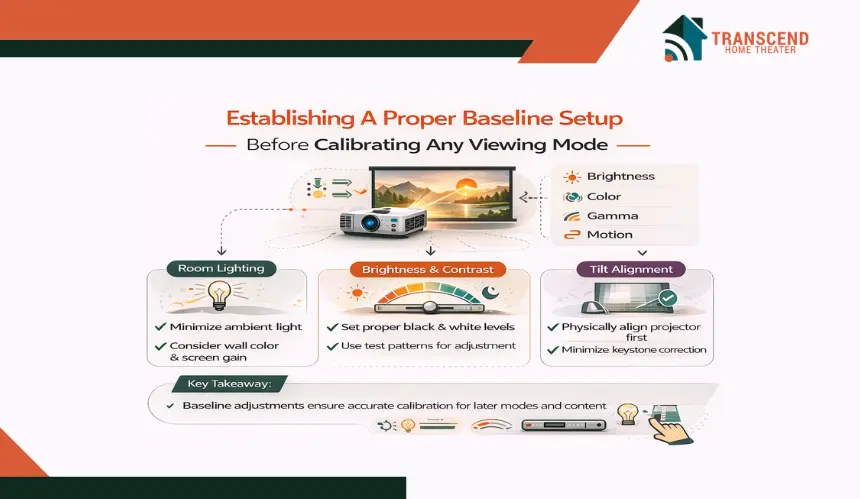
Before adjusting settings for sports, movies, or gaming, the projector must be configured correctly at a fundamental level. Calibration becomes unreliable when brightness is misaligned, contrast is clipping, or the projector is poorly positioned. A clean baseline ensures that every later adjustment delivers predictable results.
How Room Lighting And Screen Type Influence Image Quality
Ambient light reduces perceived contrast ratio and weakens black level depth. In a bright living room with ceiling lights or daylight exposure, shadow detail fades quickly, even with high lumen output. In a dedicated home theater, controlled lighting preserves dynamic range and improves image depth.
Screen gain also affects performance. A high-gain projection screen increases brightness but can narrow viewing angles. Matte white screens provide balanced color reproduction. Ambient Light Rejection screens help maintain contrast when lights cannot be fully dimmed.
Wall color contributes more than many expect. Light-colored walls reflect excess light back onto the screen, reducing perceived contrast. Dark surfaces improve depth perception and enhance overall image accuracy.
Understanding these environmental variables ensures that calibration adjustments later are not compensating for room-related limitations.
How To Properly Set Brightness And Contrast For Accurate Black And White Levels
Brightness controls the projector’s black floor. Contrast determines highlight intensity. Together, they define usable dynamic range.
To set brightness:
- Display a dark scene or black level test pattern.
- Lower brightness until blacks look deep but still retain subtle shadow detail.
- Avoid crushed blacks where detail disappears completely.
To set contrast:
- Use a bright test image.
- Increase contrast until highlights appear strong but not blown out.
- Reduce slightly if fine details in bright areas begin to clip.
Correct black and white level calibration improves shadow clarity, highlight preservation, and overall image balance across all viewing modes.
Why Physical Alignment Matters More Than Digital Keystone Correction
Keystone correction digitally reshapes the image when the projector is angled incorrectly. While convenient, excessive digital processing softens edges and reduces pixel accuracy, especially noticeable in 4K resolution or high refresh rate gaming.
For optimal sharpness:
- Mount or place the projector level with the screen.
- Use optical lens shift if available.
- Minimize digital keystone adjustments.
Proper alignment preserves native resolution, maintains clean edge detail, and ensures that later calibration for sports, movies, or gaming is based on true image geometry rather than digitally altered scaling.
Calibrating Projector Settings Specifically For Sports Viewing
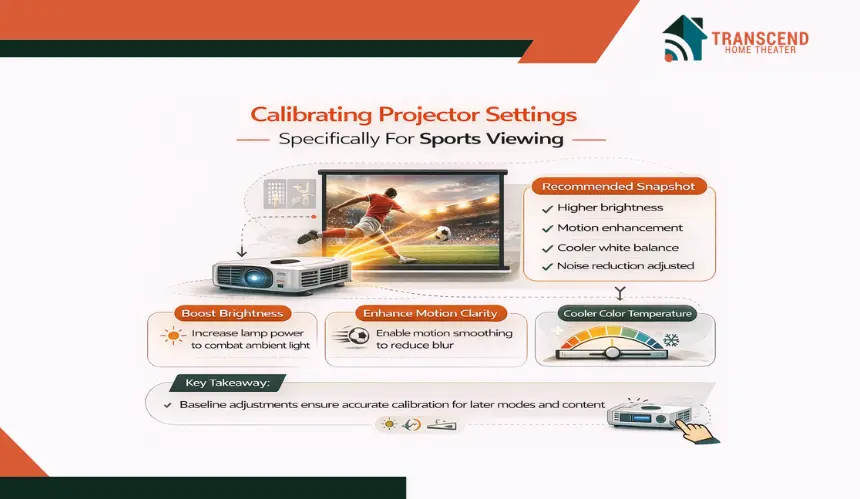
Sports content places unique demands on a projector. Fast camera pans, bright stadium lighting, and rapid player movement require strong brightness output and enhanced motion clarity. Unlike cinematic content, sports viewing prioritizes visibility and smooth motion over strict color accuracy.
How To Increase Brightness For Live Sports Without Washing Out Colors
Sports are often watched in rooms with moderate ambient light, especially during daytime games. Increasing lamp power or switching to a brighter preset can help maintain image visibility. However, simply raising brightness can reduce perceived contrast and wash out blacks.
To optimize:
- Increase lamp mode or lumen output gradually.
- Slightly raise contrast to maintain highlight intensity.
- Keep brightness balanced to avoid grayish blacks.
- Avoid oversaturating colors through excessive dynamic settings.
A slightly cooler color temperature, around 7000K, can make whites appear crisper under room lighting. This improves perceived sharpness during fast-moving plays without significantly distorting team colors.
Should Motion Smoothing Be Enabled For Sports Broadcasts
Motion handling is critical for sports. Frame interpolation or motion enhancement features can reduce motion blur during fast transitions, such as a football pass or a basketball fast break.
Enabling motion smoothing:
- Improves motion clarity.
- Reduces blur during camera pans.
- Enhances object tracking on large screens.
Unlike movies, where motion smoothing creates an artificial look, sports benefit from higher motion interpolation settings because the goal is clarity and responsiveness rather than cinematic cadence.
Recommended Sports Viewing Settings Snapshot
For quick reference, sports calibration typically includes:
- Higher brightness or lamp power.
- Moderate to strong contrast.
- Motion enhancement enabled.
- Slightly cooler white balance.
- Noise reduction adjusted carefully for broadcast compression artifacts.
These adjustments improve visibility in bright scenes, maintain motion clarity, and ensure consistent performance during live sporting events. The result feels energetic, immersive, and easy on the eyes, even during extended viewing sessions.
Calibrating Projector Settings Specifically For Movie And Cinema Viewing
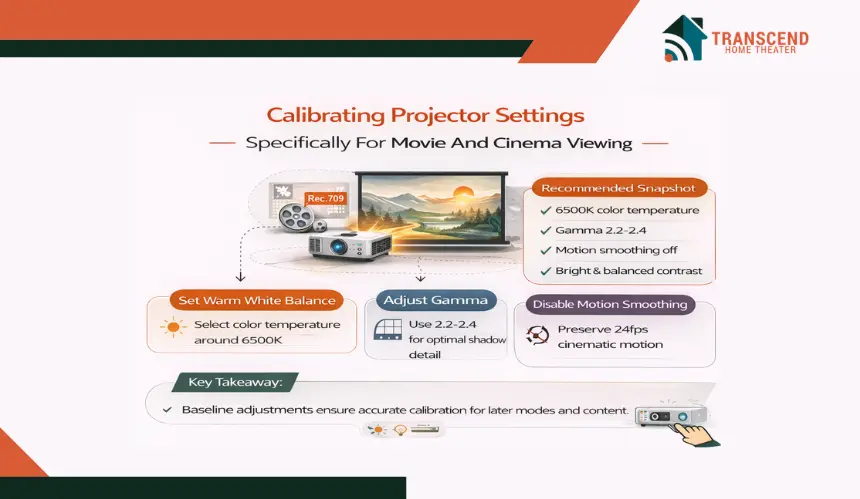
Movies demand a completely different visual approach than sports. Instead of maximum brightness and aggressive motion enhancement, cinematic content relies on accurate color reproduction, controlled contrast, and natural motion cadence. The goal is immersion that feels true to the director’s intent, not artificially sharpened or overly bright.
How To Set Color Temperature For Accurate Skin Tones And Natural Whites
Film content is mastered around a D65 white point and Rec.709 color space for standard dynamic range. This means the projector should aim for a warm color temperature near 6500K.
To optimize color accuracy:
- Select Cinema or Movie mode as the base preset.
- Choose a Warm or 6500K color temperature setting.
- Avoid Cool presets, which shift whites toward blue and distort skin tones.
- Disable excessive color enhancement features.
Correct white balance ensures realistic facial tones, accurate shadow hues, and natural midtone transitions. When calibrated properly, the image feels deeper and more authentic rather than artificially vivid.
How To Adjust Gamma For Better Shadow Detail And Depth
Gamma affects how midtones transition between black and white. For movie viewing, a gamma setting between 2.2 and 2.4 typically delivers optimal results, depending on room darkness.
In a dedicated dark room:
- Use gamma 2.4 for deeper blacks and stronger contrast perception.
In a room with mild ambient light:
- Use gamma 2.2 to preserve visibility in darker scenes.
Proper gamma calibration enhances depth perception, improves low-light detail, and maintains highlight balance in HDR tone mapping. This is especially important for films with complex shadow scenes or high dynamic range grading.
Why Motion Smoothing Should Be Disabled For Cinematic Content
Most movies are filmed at 24 frames per second. Motion interpolation alters this natural cadence, creating what many viewers describe as the soap opera effect.
For authentic film playback:
- Turn off frame interpolation.
- Disable aggressive motion enhancement.
- Keep image processing minimal.
Preserving the native frame rate maintains cinematic motion flow and prevents unnatural smoothness. The result feels immersive and faithful to theatrical presentation.
Recommended Movie Viewing Settings Snapshot
For cinema calibration, focus on:
- Medium brightness suited to room darkness.
- Balanced contrast without highlight clipping.
- Warm color temperature near 6500K.
- Gamma between 2.2 and 2.4.
- Motion smoothing disabled.
These adjustments prioritize color fidelity, shadow detail, and contrast depth, transforming movie nights into a true home theater experience with accurate dynamic range and immersive visual realism.
Calibrating Projector Settings Specifically For Gaming Performance
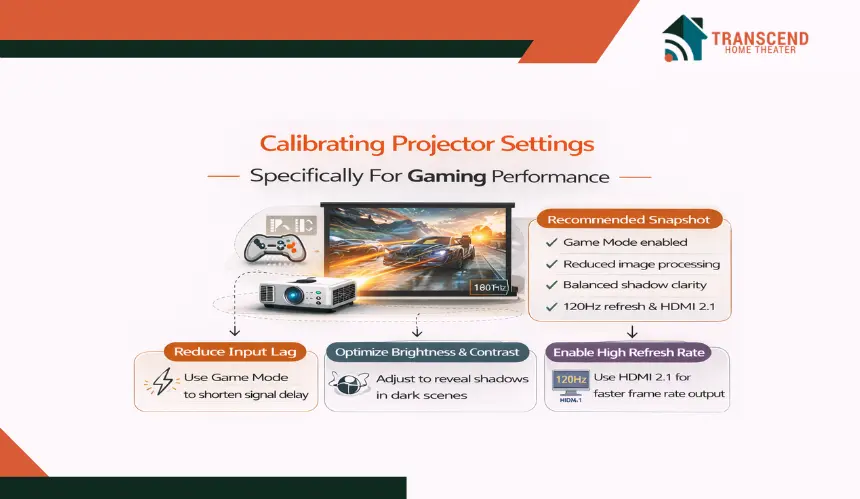
Gaming places performance demands on a projector that are completely different from sports or movies. While image quality still matters, responsiveness becomes the top priority. High input latency can make controls feel delayed, especially in competitive titles where reaction time matters.
How To Reduce Input Lag On A Projector For Faster Response
Input lag is the delay between pressing a controller button and seeing the action on screen. Projectors add processing time through image enhancements, motion interpolation, and dynamic contrast adjustments.
To reduce latency:
- Activate Game Mode if available.
- Disable motion smoothing and frame interpolation.
- Turn off noise reduction and dynamic contrast processing.
- Use a direct HDMI connection without signal converters.
Game Mode shortens the image processing pipeline, reducing response time. Lower input latency improves aiming precision, camera movement fluidity, and overall gameplay responsiveness.
For advanced setups, ensure the projector supports HDMI 2.1 or at least 120Hz refresh capability when paired with modern consoles or gaming PCs.
How To Optimize Brightness And Contrast For Competitive Visibility
In many games, especially first-person shooters and dark RPG environments, shadow visibility becomes critical. Overly dark settings can hide enemies in low-light areas.
To optimize competitive clarity:
- Slightly increase brightness to reveal shadow detail.
- Maintain balanced contrast to preserve depth.
- Avoid crushing blacks in dark scenes.
- Adjust in-game HDR settings separately if supported.
Unlike movie calibration, gaming settings may benefit from slightly elevated midtones to improve visibility without flattening the overall dynamic range.
How Refresh Rate And Resolution Affect Gaming Smoothness
Refresh rate determines how many frames are displayed per second. A projector supporting 120Hz will deliver smoother motion than one limited to 60Hz, particularly in fast-paced titles.
When calibrating:
- Match the console or PC output resolution to the projector’s native resolution.
- Avoid forcing 4K output on a projector optimized for 1080p if it increases input latency.
- Enable high refresh rate output when available.
Balancing resolution and refresh rate ensures smoother gameplay, clearer motion, and minimal performance compromise.
Recommended Gaming Settings Snapshot
For gaming-focused calibration:
- Game Mode enabled.
- Motion processing disabled.
- Reduced image enhancement features.
- Balanced brightness for shadow clarity.
- Correct refresh rate matching console output.
These adjustments create a responsive, immersive experience where visual performance supports gameplay precision rather than slowing it down.
Fine-Tuning Projector Settings Based On Your Room Environment
Even with sports, movie, or gaming modes properly calibrated, the room itself can dramatically influence perceived image quality. Two identical projectors can look completely different depending on lighting conditions, wall color, and seating distance. Fine-tuning settings for your specific environment ensures that previous adjustments perform as intended.
How To Calibrate A Projector In A Bright Living Room
Bright environments reduce perceived contrast and weaken black levels. Daylight from windows, ceiling fixtures, and reflective surfaces all impact dynamic range.
To optimize in a bright room:
- Increase lamp power or switch to high brightness mode.
- Slightly raise contrast to maintain highlight intensity.
- Use a neutral to slightly cool color temperature for perceived clarity.
- Consider an Ambient Light Rejection screen for better contrast retention.
Higher lumen output becomes critical in these environments. However, avoid excessive brightness that washes out darker tones. The goal is controlled luminance, not maximum output.
How To Calibrate A Projector In A Dedicated Dark Home Theater
In a controlled dark space, contrast performance becomes far more noticeable. Lower brightness settings can deliver deeper blacks and improved shadow detail.
For dark rooms:
- Reduce lamp intensity to prevent eye fatigue.
- Fine-tune gamma for improved depth perception.
- Maintain accurate color temperature near 6500K for cinematic realism.
- Minimize reflective surfaces around the screen area.
Dark-painted walls and ceilings significantly enhance perceived contrast ratio. When ambient light is controlled, subtle adjustments to black level and gamma produce noticeable improvements in dimensionality and realism.
How Seating Distance And Screen Size Influence Perceived Sharpness
Seating distance affects how viewers perceive resolution, pixel structure, and motion clarity. Sitting too close can exaggerate noise or compression artifacts. Sitting too far reduces detail visibility.
To optimize viewing geometry:
- Align seating distance with screen size using standard projection viewing ratios.
- Ensure focus precision across the entire screen.
- Confirm that lens shift adjustments do not distort image uniformity.
Proper viewing distance improves immersion and maintains clarity whether displaying 1080p or 4K resolution.
With environmental fine-tuning complete, the projector now delivers optimized performance tailored not just to content type, but to the physical space where it is used.
Projector Calibration Considerations For Homes In Virginia And Maryland
Homes in Virginia and Maryland often feature large open-concept living areas with expansive windows, especially in Northern Virginia suburbs and waterfront properties near Annapolis. These architectural styles introduce significant ambient light during daytime viewing.
In these environments, higher lumen projectors, ALR screens, and carefully managed window treatments become essential for maintaining contrast.
Basement home theaters, common in many Maryland and Virginia properties, allow more controlled lighting and benefit from precise gamma and black level calibration for deeper cinematic performance.
With environmental fine-tuning complete, the projector now delivers optimized performance tailored not just to content type, but to the physical space where it is used.
Quick Mode-By-Mode Projector Calibration Comparison Chart
After adjusting each mode individually, many users want a simple side-by-side reference they can quickly apply. The chart below summarizes how brightness, motion processing, color temperature, and performance priorities differ across sports, movies, and gaming.
Setting / Priority | Sports Viewing | Movie Viewing | Gaming Performance |
Brightness Level | High to combat ambient light | Medium, optimized for contrast depth | Medium to slightly elevated for shadow visibility |
Contrast Setting | Moderate to strong for vivid highlights | Balanced for dynamic range accuracy | Balanced to preserve detail without clipping |
Color Temperature | Neutral to slightly cool (around 7000K) | Warm, near 6500K (D65 standard) | Neutral for balanced clarity |
Gamma | Standard 2.2 for visibility | 2.2 to 2.4 depending on room darkness | 2.2 for balanced midtone detail |
Motion Processing | Enabled for smoother fast action | Disabled to preserve cinematic cadence | Disabled to reduce input lag |
Input Lag Priority | Moderate importance | Low importance | Highest priority |
HDR Tone Mapping | Balanced for bright scenes | Optimized for highlight and shadow accuracy | Balanced with game HDR settings |
When configuring a projector during Home Theater Design & Installation, it is best practice to create separate user presets labeled Sports, Cinema, and Game. This avoids constant manual adjustments and ensures consistent performance for each content type.
A great picture does not happen by accident. It happens when every setting is tuned with purpose. If you want your projector calibrated perfectly for sports, movies, and gaming without the guesswork, the team at Transcend Home Theater can design and fine-tune a system built around your room and viewing style.
Frequently Asked Questions
Is professional projector calibration worth it for home use?
Professional calibration becomes valuable when image accuracy and system integration matter. Installers use colorimeters, calibration software such as CalMAN, and reference test patterns to fine-tune grayscale tracking, color gamut alignment, and HDR tone mapping beyond basic menu adjustments.
Professional calibration ensures consistent performance across all sources and protects the long-term value of the equipment.
How often should a projector be recalibrated?
Projector performance changes over time due to lamp aging, laser brightness shifts, and firmware updates. Lamp-based projectors may require recalibration every 500 to 1,000 hours of use. Laser projectors are more stable but should still be checked annually if image precision is important.
Routine recalibration maintains accurate white balance, consistent brightness output, and stable color accuracy across viewing modes.
Does a firmware update affect the projector's picture quality?
Firmware updates can modify image processing algorithms, HDR tone mapping behavior, and HDMI compatibility. Some updates improve color accuracy or reduce input latency, while others reset picture presets to default values.
After installing new firmware, it is recommended to verify brightness, contrast, and color settings to ensure the projector still performs as intended.
What is the ideal screen size for projector gaming and movies?
Screen size should align with seating distance and native resolution. For 4K projectors, viewers can sit closer without noticing pixel structure. For 1080p systems, excessive screen size at short distances may reveal compression artifacts or reduced sharpness.
A common guideline is sitting 1 to 1.5 times the screen width for immersive viewing while maintaining visual comfort.
Can streaming devices impact projector image performance?
Yes, streaming devices influence signal quality, HDR output format, and refresh rate compatibility. Incorrect output settings can cause washed-out colors, mismatched frame rates, or improper HDR tone mapping.
Ensuring the streaming device resolution, color format, and frame rate match the projector’s native capabilities preserves clarity and maintains accurate image performance.